Tuesday, 20 September 2016

Ebb M4 project goings

Some problems finding a new piston for my next gen M4. Stock one was stripped so I tried to find alternative from SHS.


I have lots of good experience from SHS parts from AEG side so I gived SHS next gen a try

Well it lasted about 200 shots and rack tore itself out. I had even epoxied the rack and corrected angle of engagement.

Spring was around m130

Time to order Prometheus piston


Friday, 3 June 2016

BTC Spectre for Tokyo Marui Next Gen Gearbox quickie

BTC Spectre SneakPeak


Just got some goodies from overseas! Managed to grab one straight from Blacktalon Customs!

Will be installing this next weekend and hope to do some skirmishing next Sunday in Local Pirkanmaasoft games!


Not sure yet should I rewire my unit to front or keep it as it is. Yay or nay?


You can get yours from Blacktalon Customs or some distributor. They are in huge demand so be prepared to wait long time! I got mine by adding myself to notification list and ordered one minute after I got my notice!


From BTC Homepage:


Advanced Technology
Can handle power surges up to 9000 watts and even run on car batteries!
Fully computerized and driven by a high speed PIC18F14K22 microprocessor.
Multiple internal layers of heavy copper traces for greater current capacity.
Short circuit detection and voltage spike suppression circuits to protect the controller.
Smart thermal management allows the controller to remain cool under sustained firing.

MOSFET Trigger
Eliminates damaging electrical arcing of the trigger switch contacts.
Lower resistance compared to mechanical switching, increasing motor current.
Driven by dual IRF671812PBF, a compact yet powerful next-gen MOSFET!

Dynamic Braking
Eliminates the motor spin-down time to prevent the piston from over-traveling.
Assists in keeping the piston properly reset to reduce stress on the gearbox.
Prevents double firing on semi-fire in extremely high RoF setups.
Also driven by dual IRF671812PBF MOSFETs!

Cycle Completion
Gearbox always completes the last cycle regardless of when the trigger is released.
Assists in keeping the piston properly reset to reduce stress on the gearbox.
The motor will always have the smoothest and most consistent startup.
Allows the anti-reversal latch to be removed.

Fully Configurable Fire Select
Both fire select positions can be individually configured, for a total of 64 possible configurations.
Available options for each selector position:
Semi fire
Auto fire
2 round burst
3 round burst
4 round burst
5 round burst
Semi with ramping
Burst-auto hybrid
"Semi w/ Ramping" fires in semi and switches to full auto if the trigger is rapidly tapped.
"Burst-auto hybrid" fires in burst and switches to full auto if the trigger remains held down.
Can convert any AEG to semi-only by having both selector positions set to semi fire.

Realistic RoF Control
Both fire select positions can be individually configured with a different RoF.
Every cycle runs at full speed and pauses between each shot to reduce the RoF.
Provides the most realistic feel and sound compared to any other forms of RoF reduction.

Adjustable Precocking
Precocking stops the piston in a compressed state so the next shot is near-instantaneous.
The precocking is fully adjustable and thus also compatible with short-stroked pistons.
Offers improved realism and trigger response for sniper or low RoF builds.

LiPo / LiFePO4 Monitoring
Monitors LiPo and LiFePO4 batteries to cutoff power before overdischarge occurs.
Simply set the number of cells and the controller will use the proper cutoff voltage.

Programmable Digital Fuse
Sensor-based current monitoring negates the need for a physical fuse.
Cutoff threshold fully adjustable to help protect low-output batteries from over-current damage.

Gearbox Reliability
Eliminates the trigger jam normally caused by the cutoff lever stopping at a certain position.
The cutoff lever mechanism is no longer needed, greatly reducing the chances of semi-fire related issues.
The anti-reversal latch can also be removed to make gearbox reassembly much easier.


Spectre comes with a original Deans T-Plug


Wednesday, 4 May 2016

Project Start: Tokyo Marui M4A1 SOCOM Next Gen. Recoil Shock

Tokyo Marui M4A1 SOCOM Next Gen. Recoil Shock Project start


Spring is finally here and our airsoft season is starting fully. I wanted to have something new and interesting to tinker around. So I was able to acquire second hand unused TM recoil M4 that has been laying in closet since 2009.

Gun in in good condition but internals need some sweet care. New TM Gun should shoot about 0.9J but this one shot only 0.5J! Overall performance is really sluggish etc. Time to open it up and upgrade this beast where it belongs!

My plan is to make my CQB-Gun that shoots about 1,2J with 0.30 BB (for the best range and accuracy). I have some SHS and Orga parts already but I will check is there anything that needs to be upgraded in TM gun. (They work really well with stock setup)

I want to keep this gun in quite basic setup externally. Something like that you can find in movie SWAT. I had G&P M500 handguard laying around and it fits really well to this classic.

G&P M500 is upgraded already wit 1200 lumen LED module so opponents will be stunned by the awesomeness of this!


I also managed to get BTC Spectre for next gen and it will arrive soon! Cant wait for it!


Some pictures of internals that are waiting for this project:


I will be keep you updated how this project progress, stay tuned!

Thursday, 28 April 2016

Lonex / Lancer Tactical MMC PDW AEG

Lonex / Lancer Tactical MMC PDW AEG


Boys from the Tradesoft sent me some interesting new stuff to try out! CQB-AEGs mainly!


I have tested older models of Lonex M4 AEG before and they are really one of the best stock guns (technically) there is! This time I got my hands on MMC PDW model.

This gun goes by many names: In U.S its under Lancer Tactical brand, in Europe its BO Dynamics (or something like that) but its OEM by Lonex and I have here original OEM gun.


I wont write as long technical tests in these english versions (this will change) but I will let the pictures do the talking. 


Gun has some nice features and really top notch internals! All the parts are sold separately as a tuneup parts so this gun is quite a bargain. 


Features:


  • QD Spring Change
  • BUIS
  • AFG
  • Polymer Flash Mag
  • EBB Electronic BlowBack (can be upgraded to Recoil Shock)
  • Freefloat Rail System
  • Integrated Mock Silencer
  • Ergonomic Pistol grip
  • Sling attachment point for one point slings in end-plate
  • Fake bolt can be locked back and released with bolt release


Gun itself has nylon fiber reinforced polymer receiver and rail system. Ergonomic pistol grip and crane style stock is also made from same sturdy material. All the small bits and pieces are made from high quality steel and my trusty test magnet attaches almost to all small metal parts.

Fake bolt can be loaded back and be released with bolt release. This makes dialing the hopup much easier. 

Gun also has a EBB that's quite nice feature to have for those who wants some little realistic extra. Its really easy to disable if you want to! (Just remove two screws on top of the gearbox)


 Outer barrel and mock silencer is made from stainless steel. So it gives lots of weight end sturdy feeling for this small gun.

You can add some foam inside the tube to get more muffled sound. Inner barrel goes almost to the front of the can.


Polymer BUIS that can be flipped down.

As said: body is made of really high quality polymer. Body itself is quite light but internals and outer barrel gives this gun lots of weight.


QD-Spring system and recoil upgrade takes all that room inside the buffer tube. You have to use crane-stock or battery pouch to accommodate your battery.

In lonex version recoil shock has to be bought separately. Not sure about BO and Lancer versions.


Internals:


  • 8 mm. reinforced V2 gearbox (EBB Version)
  • M120 Spring that gives out 1,44J with 0,20g bb and 1,7J with 0.30g (joule creep...)
  • 8 mm. Steel ballbearings with enclosed casing
  • 18:1 Steel Gears 
  • Steel Cutoff lever
  • A5 Ferrite motor (A2 with recoil shock package)
  • Red 14t piston
  • POM Piston head (AoE version)
  • POM Nozzle with o-ring
  • Steel Cylinder
  • Steel Spring guide with ball bearings
  • Low-Res wiring to back with mini tamya connector
  • etc good lonex stuff
Gun uses also nice rotary style hop up with Lonex 70 bucking. Stock barrel is brass and it should be 6.04 mm.


Modified V2 gearbox, quick change spring system can be seen quite clearly.


Nice 14t piston that has full metal teeth rack


Nicest stock gears that I have seen in any gun.


Nozzle has O-ring for better air seal. Cylinder is steel and bit overvolumed. Its meant for 363+ barrel. Compression is great!


Summary


My real Eotech goes nicely with this gun! ;)


Performance for this gun is awesome. I could get all the bbs to a oil barrel in 60 meters ( about 200 feet). Thats quite good performance with this short gun. Stock spring gave me about 1,44J with 0,20G and 1,7-1,8J with 0,30g bb, rise in ouput is because cylinder is overvolumed.

Gun shoots too hot for CQB with stock spring but its really easy to change.

MMC is not a light gun and pistol grip is quite large so you need big hands that its comfortable. But luckily its really easy to chance to grip that suits your hands better. Dont be alarmer, I liked it alot but I have large man-hands! ;)


Great performer, solid construction and nice recoil (especially with recoil shock).


Maybe not most beautiful gun on the market.


Wednesday, 27 April 2016

Quick Flat-Hop Guide

Terve!


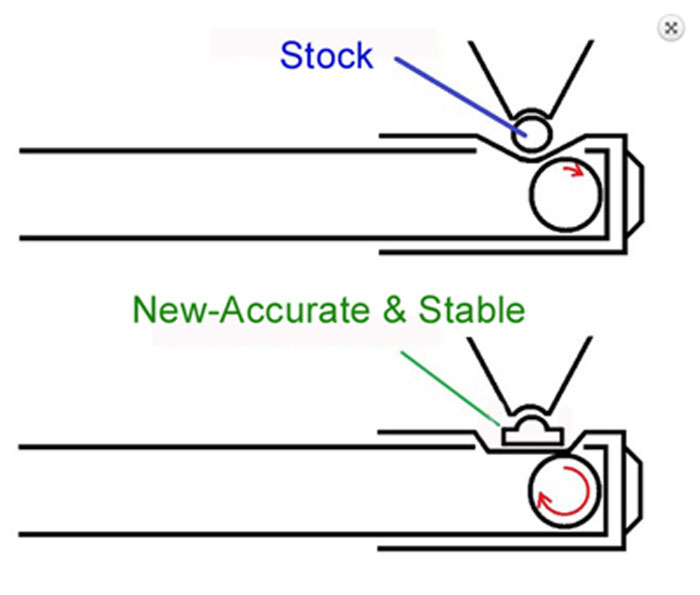
This is easy and short version of popular Hop Up mod called Flat Hop, its idea is to have longer contact surface to bb to give it better and more stable backspin.

You do this by

Flat-hop is great upgrade for your airsoft gun, its easy to make, gives good results compared to stock hop-up. It has its drawbacks compared to IR-HOP or R-HOP but in normal AEG 1 - 1,6J power range its a good alternative.

I would recommend this for AEGs with 1 - 1,7J and 0,28g or 0,33g Good quality ammo.


Pros:

  • Increased range
  • Increased accuracy
  • lets you use heavier bbs 
  • Sounds cool when you are selling your gun! ;)
Cons: (compared to IR-hops)
  • Wears out quite fast, faster if you don't clean your setup regularly
  • Not that tolerant to cold weather
  • Bucking is still acting as air-seal and spins the bb
  • Wont give as good results with heavy bbs and high power levels (0,40+ 3J+)

Amped Airsoft have made really good video guide:


The guide:

"Classic Nub and hopup / Flat-Hop"


You need:
  • Sharp knife or blade (I use spare blades from box cutter)
  • Quick Glue for nub ( Locktite 406)
  • Hop-Up Bucking and Flat-hop Nub (Prometheus Purple or Lonex 70)
  • Fine Sandpaper, to finish your cutting
  • Pliers to turn bucking around
Recommended product, mainly for M4 platform:
  • Lonex 70 Bucking
  • Madbull red (for Wolverine HPA)
  • Prometheus Purple
  • Prometheus Flat nub
  • Firefly Namazu nub
  • PDI Barrels 
  • Prometheus 6.03 and 6.05
  • Orga 6.05
  • ZCI 6.02 / 6.03
  • G&P M4 Hopup unit
  • Prowin M4 hopup 
  • Systema M4 hopup unit
  • Lonex M4 Hopup unit 


1. Take your bucking and turn it around so you can cut off  those pesky ridges that are inside the bucking. Put bucking over your barrel and use your blade to take those off.

2. Finish the process by sanding rough surface to bit smoother. You can use silicon oil to make that even smoother.

Remember to remove ridge that pushes the bb normally and also that longer ridge that goes to barrels groove. This will be explained later.

You can fill that groove from the barrel with glue or silicone. This helps with the airseal!


3. Turn the bucking around again and put it aside to wait for later stages

4. Optional: You may need to enlarge you barrels "window" to get best results. This varies between different barrels. Orga, Prometheus and PDI has already box-like windows so there is no need for modification normally. This also goes with most of the stock barrels. If the front wall of the window is sloped then you have to make these modifications.

Just file that slope flat and make sure that there is no burrs inside the barrel!

5. Put your bucking back to its place over the barrel and turn it around about 45 degrees. So that smooth uncut part of the bucking goes over the hopup window (this is possible only if you cut that long ridge off)

6. If you are using normal flat-hop nub then now is the time to install it to the hopup arm (piece that pushes nubs towards the bucking). Cut it to fit your window (inside the hopup unit) and use some glue to fix it in its place. Cut more from  the "front" than from the "rear"


If you want to use eraser or M-Nub then you need to remove prongs for you hopup-arm and  glue new nub to its place. Remember to cut M-Nub short enough that it will fit your hopup window.


For Prowin M4 hopup you can use normal Flat-hop nub or you can get Flat-hop arm from Shapeways (you can use EIR hops with this!)


6. Just assemble you hop up as normally and start testing. Remember to check that your nozzle alignment is spot on!

If bb curves to one side or the other then your nub is not straight. You can try to fix this by turning inner barrel opposite side but first i would check nubs position.


Sunday, 24 April 2016

Back in business


Terve! (Hi in Finnish)

It has been a really long time when I last time published here anything. R-Hop tutorial has been quite popular since 2012 and it starts to be quite outdated now in 2016. I am planning to write updated one in english in coming weeks!

I have been mainly writing my Finnish blog / technical articles in pmakiku.pic.fi/blog but my plan is to activate this english version with shorter stories.


I have lots to write about already and now when I have a dayjob it makes getting new stuff to test much easyer!

Coming articles in spring 2016:

- Odin Innovations M12 BB-Loader
- Jefftron V2 Processor unit
- How to build N52 Frankentorque
- Ares Amoeba 140 Midcaps
- Updated IR-Hop Guide
- Tokyo Marui Next Gen. M4 SOCOM EBB


So lots to wait for! Stay tuned


Is anybody coming to Berget this year? Its my fifth one!


Thursday, 3 May 2012

R-hop installation manual


R-Hop installation manual Vol.2


UPDATING! 5/4/2016


I will be updating this manual soon with much faster and easier method to do R and ER hops... (upgrading it now so there might be some text and pictures missing)


I have upgraded my guide with newer method to do R-Hop much faster. Idea is not to shave anything inside the patch but to cut its length and height to match your barrel ID. This way you get smoothest possible contact area for your BB and same significant amount of time.


Its also much easier than traditional method!


You can find this newer method in end of this blog post!


Remember that my native language is Finnish so don't expect perfect spelling.

I will not be responsible if you break something or hurt yourself when you are using this tutorial. ;)


This is my way of installing R-hop, there are many ways to do this. You can do installation in different order as you like.


Every gun is individual and installation is made for that specific setup (barrel, hop-up, nozzle etc...) 

If you use heavier bbs you get more range and accuracy in longer distances. 
The positive down side is that you can not use anymore low quality bbs. 
Hopup is still adjustable.

R-hop can be installed in all barrels  with a window (if  not, you can do it). AEG's, AEP's, springers, PTW's, gas, etc. Each requires a bit different tuning.


There are small exceptions in different systems  that require some modifications to get R-hop working.

In picture below for example: KM 6.04 TBB(some systema tbbs have this same design) where the front  edge of the window is angled. We want to make edge straight so installed nub would not slip away. Problem with this design is that (as said before) patch contact area is too short to bb and patch does not sit well in its place

With a 5 min filing  even this issue can be resolved.


You want to file that lower barrel window (angled) to straight like upper barrel


R-hop™ By HS5


" This is my adaptation of the G-hop developed by Ishioka, currently one of the best precision shooters in airsoft. The idea behind the R-hop is to produce an extended contact with the bb for more gentle and precise acceleration resulting in longer flatter trajectories which are far more accurate and more tolerant of inconsistencies within the bb. The product itself is a contact patch which fits in your hop window replacing the regular hop "mound." 

" The other major advantage of the R-hop is that it finally separates the friction patch from the airseal rubber. Many hopups which seal very well do not apply backspin well and vice versa. The problem is especially acute in high power setups with hard hop rubbers and heavy ammo. This divorces the two of each other allowing previously unattainable levels of accuracy in high power long range guns. The R-hops are now also available in cold tolerant "ice" versions, so all the same performance is available year round, or in gas powered guns. They are denoted by the addition of I to the name, so IR and IER hops respectively. "


First couple of links for  installer and user. Some good to read information before you start to ask questions which probably has been answered quite a few times already. 


Different  HS5 R-hop versions:


R : Normal and original patch made from rubber

IR : ICE, for cold weather, great for our scandinavian weather. Much easyer to cut and works well during wintertime. Recommended for gas-guns.

ER : EXTENDED 
Extended version of R/IR patch. Is recommended for heavier bbs (.30g+) with higher velocities. Barrel window must be modified for this. 
By extending the window (rotary-tool, file, lathe)

Z-kit : Patches cut already for different barrel windows. Some minor modifications needs to be done. Results are not that good as with original R/IR patch.


Installation:

2. "Patch"
3. "Concave groove"
4. "Nub"
5. Gluing the patch to its place


Get good hopup bucking that seals your setup well. I recommend myself Madbull and Lonex bucking


First thing to do is remove ridge inside the bucking that pushes bbs in normal hopup. I use exacto knife / dremel and sandpaper to do this. Some silicone oil in final stage.

Turn bucking around example over the barrel and start cutting ridge away. Be very carefull when you turn bucking around because it gets ripped very easily.
And even more careful not to cut too much away, rendering bucking unusable.


Bucking turned around over the barrel. Allowing easy sanding of bucking ridge.


Bucking ridge removed

Next turn bucking carefully back around and put it in safe place to wait for later usage.


IR-Nub in place, needs to be cut in length.


In picture above you can see normal situation in this phase of installation. You have just opened delivery pack and try to match patch to window :) Well it doesn't fit... so you have to cut patches length  to fit window (in some cases you need to file window as said earlier)


You can leave 0.5mm gap between barrels window front wall and patch front (it is not necessary if you can fit patch well enough to fill whole window)


(in this phase of manual I use some silicone hose with right dimensions to demonstrate installation. Yes you can make setups with this hose, but i still recommend original materials from HS5 ;)


Patch length cut to fit window. Still too high

Patch height must be 1:1 (or bit less) as barrel outer diameter. This can be achieved by cutting and sanding patches "legs" from U-shaped patch. I use exacto-knife, sandpaper and rotary-tool(dremel with diamond sharpening bit) for this. You can also use files and forceps (for keeping patch in place)


IR-patch in level with barrels outer diameter


Patch sanded down to fit window in lenght and height, (sorry for messy patch, demo from silicone hose)


Sanding down patch outer diameter

Great going! You should now have a patch which sits well in barrel window. Put bucking over barrel and patch. When you look inside the barrel (from back) you should see something like in pictures below:


In this situation patch pushes inside the barrel, that is something that we don't want. Start filing that groove down. 

I use myself rotary tool (with chainsaw chain sharpening bit) for rough grinding. After i get to point that you can roll bb past that patch (bucking inserted) with little next to nothing effort you can start fine tuning. I use Round file and sandpaper rolled over 6mm wooden stick (starting from 400 grit size and ending to 1200)  

When you get to this point and you cant see any of the patch inside the barrel. You can start test shooting. 

Insert bucking over the patch and barrel normally. And assemble your gun normally.
Your gun will probably give too much spin at this point so you just have to grind that groove down still. Repeat again and again until you get good results with desired bb weight.
You can use Jig(half pipe cut to fit) to keep patch in place. (easiest, see from Maekis videos, You can also get these from HS5 armory)
You also can use our fingers to keep patch in place but I can tell you, its quite hard :)

I modify my patches for .28g in AEGs with 1.6J power and .36 for DMR / Springer (2-3J)
You can make your patches work with .25 and .20 but there is no point for lighter bbs because you would loose range and accuracy.

Remember that its too easy to take material off, but its quite damn hard to put it back :D

Couple of good videos made by Maek, shows how to grind OD and inner groove:


M-nub, Picture is courtesy of  HS5 and in loan


I use the M-nubs  to achieve a uniform pressure throughout the length of the pad. The picture shows how normal for hopup arm has been modified. Ridges have cut and  replaced with piece of flexible material(M-nub). Piece is cut to the same length as the U-shaped patch in the barrel.


R-hop works with normal nub but you don't get that good results with that. You should use soft as possible nub. The ideal situation is that nub would press patch down in its whole length with small curve at the bottom of the nub (because r-patch is curved also). This would give even pressure for the bb.


5. Gluing the patch to its place 


When you reach point where you get good range with good accuracy its time to glue patch in place.

You have to be absolute sure that you are done with filing and ready to move forward.
Use Syanoacrylate (quick glue) because it makes partly chemical and very thin bond  rather than a structural bond between patch and the barrel.


Method 1:

First put patch to its place in the barrel and use example a needle to put some CA between patch and barrel.


Method 2:

Put small drops of glue to the patch legs and put patch to its place in barrel window. Be very careful not to get any glue inside the groove. And most of all, put it in right place in first try ;)


Do not put too much glue because there's a risk that you get glue in that groove. But also too little glue does not keep you patch in place!

Remember to clean all surfaces first for good bonding.


Test again with shooting. If it still works well congratulations! You have a working R-hop!


The New Method: "The Pin"


Make sure that pin fits snugly and covers whole window


Here it is! As I mentioned before idea in this way of installing is not to shave ID of the patch at all. You have to find right patch size from Z-Kit or cut or sand your normal patch to fit.


This method works great with normal R and Extended installs.


Using right size pin to fill your barrel is really important. If pin is too small it lets patch to sit too low in the barrel and result is lots of overhopping! And that's not nice


You need to read old manual first to understand why and how R-hops work. It also gives you understanding to apply this new method to your old way!


Tools you need (I use):


  • Really sharp blade (Box cutter spare blade)
  • 6.00 mm. diameter pin (M4 receiver pin can be used also)
  • Good quick glue (Loctite 601 / 604 / Gel)
  • Sandpaper (400 for rough and finer for finishing)
  • Common sense
  • Small stick or tool to apply glue
Optional tools that I also use:
  • Dremel rotary tool with sanding mandrell bits etc.
  • File to remove excess glue from outside to give it sleek look


Work order:

You have your good quality barrel, patch etc. ready! Make sure that your barrel is cleaned and ready for install. I normally degrease areas where installation will happen. You can do some roughing to surfaces where patch will be glued. This makes bonding much better.


You will need to use your pin in every phase of the installation to make sure that patch fits and stays in place!


1. Fitting the patch


 Start by cutting your patch length to fit your barrels window exactly. 


2. Fitting the patch to your barrel window

Cut or sand legs of the patch so that ID curvature matches ID curvature of your barrel. Barrels have different size windows so there is no "one size fits all"

Ideally legs of the patch are parallel with the surface of your barrel window sides (surface where you glue legs / sides of the patch)


3. Sanding the front corner 

File or sand first corner of your patch to prevent pinch jams. (Gearbox side "front corner" inside your patch, see picture). 


Just a little bit so there is no 90 degree angle that could possibly press in the barrel and disturb movement of bb


4. Gluing the patch

When all previous phases has been done and your patch fits your barrel window perfectly its time to glue your patch to its place.

I use but more expensive industrial grade glues from Loctite i prefer 401 for front and end and for legs I use gel type glue.

You can do this how you like but I have found that its easiest to start with front and end of the patch. Right after I have put small amount of glue with  a screwdriver to its place I wiggle patch a bit so that glue goes in right places between barrel and patch. 

Don't apply too much glue right away and make sure that nothing goes inside the barrel (glue..) 

I also take pin out and back in quite many times at this phase to see that patch has stayed in its place and there is no extra residue inside the barrel.


Do same with the legs and apply some glue from outside. You can also wiggle the patch with your finger bit to help glue to reach its destination.


Basically same rules apply here as in traditional method.


Normally I let glue cure overnight but with good glue it's about 30 minutes when you can start moving to cutting


6. Cutting the Leftovers

Idea is to keep pin inside the barrel and cut excess material of from OD of your barrel. Your blade needs to be really really sharp to achieve optimal surface.

If you have used good glue then you can do this by rotary tool and its even faster. I still prefer cutting with blade.


(Example pictures are from demo barrel that is quite roughly cut and made. I added lots of contrast to picture for you to see details better, I didn't also use pin in these couple of pictures)


Start from the middle and go towards the edges. Then the other side. Do this first lightly because there might be some glue residue in the edges.

You can use blade also to cut these off.

Cut slices off until your batch OD is flush with barrel OD

Use sandpaper to finish the surface if needed.


Roughly finished installation, its ugly, i know! :D


At this point you have already a working R-hop. You just need to finish it my sanding and some silicone oil (you get really smooth surface when using silicone oil as lubricant).

Do some fitting and testing with your nub (I prefer M-nubs) This phase might take some time but you'll get there!


I hope that this helps you people to make those R-hop installations better and faster!