
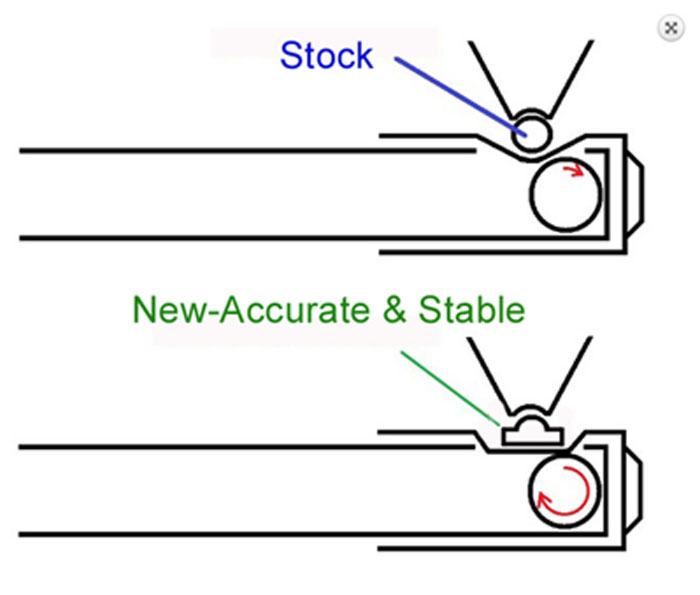
This is easy and short version of popular Hop Up mod called Flat Hop, its idea is to have longer contact surface to bb to give it better and more stable backspin.
You do this by
Flat-hop is great upgrade for your airsoft gun, its easy to make, gives good results compared to stock hop-up. It has its drawbacks compared to IR-HOP or R-HOP but in normal AEG 1 - 1,6J power range its a good alternative.
I would recommend this for AEGs with 1 - 1,7J and 0,28g or 0,33g Good quality ammo.
Pros:
- Increased range
- Increased accuracy
- lets you use heavier bbs
- Sounds cool when you are selling your gun! ;)
Cons: (compared to IR-hops)
- Wears out quite fast, faster if you don't clean your setup regularly
- Not that tolerant to cold weather
- Bucking is still acting as air-seal and spins the bb
- Wont give as good results with heavy bbs and high power levels (0,40+ 3J+)
Amped Airsoft have made really good video guide:
The guide:

"Classic Nub and hopup / Flat-Hop"
You need:
- Sharp knife or blade (I use spare blades from box cutter)
- Quick Glue for nub ( Locktite 406)
- Hop-Up Bucking and Flat-hop Nub (Prometheus Purple or Lonex 70)
- Fine Sandpaper, to finish your cutting
- Pliers to turn bucking around
Recommended product, mainly for M4 platform:
- Lonex 70 Bucking
- Madbull red (for Wolverine HPA)
- Prometheus Purple
- Prometheus Flat nub
- Firefly Namazu nub
- PDI Barrels
- Prometheus 6.03 and 6.05
- Orga 6.05
- ZCI 6.02 / 6.03
- G&P M4 Hopup unit
- Prowin M4 hopup
- Systema M4 hopup unit
- Lonex M4 Hopup unit

1. Take your bucking and turn it around so you can cut off those pesky ridges that are inside the bucking. Put bucking over your barrel and use your blade to take those off.
2. Finish the process by sanding rough surface to bit smoother. You can use silicon oil to make that even smoother.
Remember to remove ridge that pushes the bb normally and also that longer ridge that goes to barrels groove. This will be explained later.
You can fill that groove from the barrel with glue or silicone. This helps with the airseal!


3. Turn the bucking around again and put it aside to wait for later stages
4. Optional: You may need to enlarge you barrels "window" to get best results. This varies between different barrels. Orga, Prometheus and PDI has already box-like windows so there is no need for modification normally. This also goes with most of the stock barrels. If the front wall of the window is sloped then you have to make these modifications.
Just file that slope flat and make sure that there is no burrs inside the barrel!
5. Put your bucking back to its place over the barrel and turn it around about 45 degrees. So that smooth uncut part of the bucking goes over the hopup window (this is possible only if you cut that long ridge off)
6. If you are using normal flat-hop nub then now is the time to install it to the hopup arm (piece that pushes nubs towards the bucking). Cut it to fit your window (inside the hopup unit) and use some glue to fix it in its place. Cut more from the "front" than from the "rear"

If you want to use eraser or M-Nub then you need to remove prongs for you hopup-arm and glue new nub to its place. Remember to cut M-Nub short enough that it will fit your hopup window.

For Prowin M4 hopup you can use normal Flat-hop nub or you can get Flat-hop arm from Shapeways (you can use EIR hops with this!)

6. Just assemble you hop up as normally and start testing. Remember to check that your nozzle alignment is spot on!
If bb curves to one side or the other then your nub is not straight. You can try to fix this by turning inner barrel opposite side but first i would check nubs position.
No comments:
Post a Comment